Hi, here today with a card I made for Colour Q 145 Challenge. Look at this beautiful inpiration photo
I love this floral Washi tape. I had heaps of ideas running through my head as to what I was going to do for this challenge as I am participating in the Online Card Classes Stretch Your Stamps class and am suffering from inspiration overload. This is what I ended up making, which is a total 180 from some of my original ideas, lol!
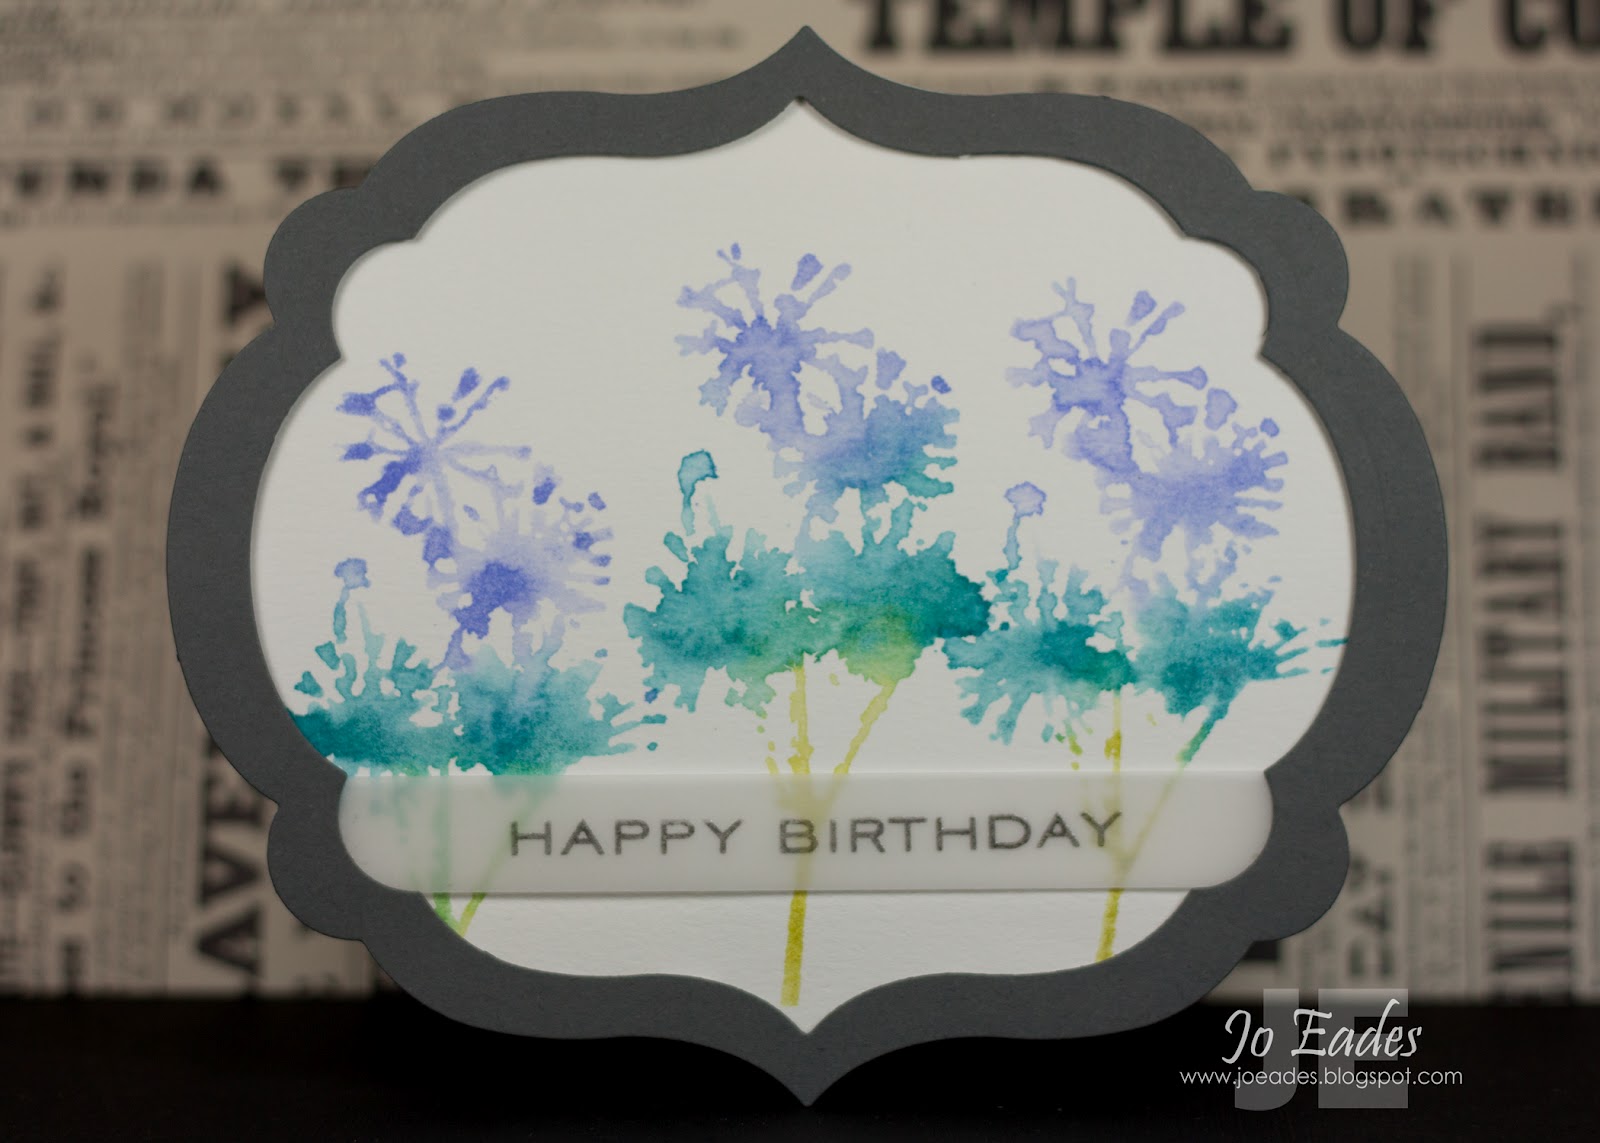
I'm pleased with the way it's turned out as it's quite different from my normal style. I've used Distress Inks for all the stamping, using techniques I learnt from Tim Holt's Creative Chemistry 101 class.
Well, I must be off - had a massive unplanned sleep in this morning and have wasted 1/2 the day already.
Thanks for visiting.
Supplies Used:
Stamps: Nature's Moments (Tim Holtz - Stampers Anonymous)
Ink: Shabby Shutters, Mustard Seed, Wild Honey, Walnut Stain, Embossing Distress Inks (Tim Holtz - Ranger)
Cardstock: Pear Pizazz, Chocolate Chip, Whisper White (Stampin' Up!), Watercolour Paper (LSS)
Accessories: Craft Mat (Ranger), Mister, Heat Tool, Embossing Buddy, White EP, Big Shot, Beautiful Wings Embosslit
Showing posts with label Colour Q. Show all posts
Sunday, July 15, 2012
Sunday, July 1, 2012
Colour Q 143
Hey
I had to make a couple of cards for birthday parties this weekend and the Colour Q combo was just perfect for one of them. Check out the colours
And this is my card
Cute, hey??? I hope Harry's little friend liked it.
Must dash, got a list of things to do as long as my arm. Enjoy the rest of your weekend. Thanks for visiting.
Supplies Used: All Stampin' Up! unless otherwise noted
Stamps: I Dig You, Best Dad Ever
Ink: So Saffron, Poppy Parade, Pacific Point, Basic Grey, Distress Embossing Ink
Cardstock: Whisper White, Basic Grey
Accessories: Heat Tool, White EP, Silver Brads
Sunday, June 17, 2012
Colour Q 141
Boy, this is the card that nearly wasn't. I spent a good amount of time last night working on this and wasn't really happy with the way things were coming together. I liked all the elements separately, just not together. I had a quick look at it again this morning and had another idea. After getting dinner started (yay for the slow cooker), doing 4 loads of washing, having lunch and cleaning the bathrooms, I finally got a chance to get back down to the studio. And joy of joys, my 5 y o son decided to join me :)
Here are this week's colours
This is what I ended up making
Yes, it's not your eyes, the sentiment is slightly crooked, but as this was my 3rd card base and the line between sane and insane becoming increasingly blurred, I just cut my losses and moved on.
I should add, I DO like my son joining me in the studio, however he does like to be close (thus bumping me a LOT) and getting into everything. He did learn today how to open my SU inkpads by himself and make sure he cleaned the stamps after he had finished. We still have a bit of work to do with inking the stamp up and closing the ink pad once finished with it. His hands are now various shades of brown, green and purple, lol! I will be trying my scubbie out on him tonight.
Well, that's it from me, nearly time to get the rice on to go with our Rogan Josh curry, which smells so good. Hopefully it will taste good too.
Thanks for visiting.
Supplies Used: Stampin' Up! unless otherwise noted.
Stamps: Pretty Peonies, Background Basics - Tin Types, Birthday Basics, Mat Stack 1 (all PTI)
Ink: Brocade Blue, Night of Navy, Bashful Blue, Lucky Limeade
Cardstock: Whisper White
Accessories: Big Shot, Corner Rounder (retired), Mat Stack 1 die (PTI)
Sunday, June 10, 2012
Colour Q 140 - Card 2
Here's my 2nd card for Colour Q, which was inspired by this card of Julie Ebersole's
The shadow stamping idea came about by accident, but I'm pretty happy with how it turned out. I did find it hard to mix and match images from different suppliers.
Supplies Used:
Stamps: Birthday Basics, Polka Dots Basics #2 (PTI), Nature's Moments (Tim Holtz for Stamper's Anonymous)
Ink: Tempting Turquoise, Island Indigo, Real Red, Lucky Limeade
Cardstock: Whisper White
Accessories: Corner Rounder (SU retired - worst decision ever, lol)
Colour Q 140 - Bling Bling
I've managed to make 2 cards for this week's Colour Q challenge. These are the colours for this week
I usually start these challenges by grabbing out my inkpads and stacking them together on my desk and then search for stamps that will go with them, cause I've found some stamps look better with certain colours. I ended up having 2 ideas - this is the 2nd idea but the first card I made
This is the 3rd version of this card. My original idea was to emboss the front using a mask to highlight the centre and then score around that centre panel. That didn't work out as well as l would have liked so I decided on this popped up panel. I was really excited as to how this was looking as I was adding all the rhinestones - they actually cover dots that are part of the stamps image - but now that it's finished, I'm not so sure about it. So I decided to make another, which I will post separately (I'm going to enter both into the challenge)
Hope you're enjoying your weekend, it's a long one here, too bad it is SO cold.
Supplies Used:
Stamps: Background Basics - Retro, Birthday Basics (PTI)
Ink: Distress Embossing (Ranger)
Cardstock: Island Indigo
Accessories: Heat Tool, White EP, Coloured Rhinestones (Kaiser)
Sunday, June 3, 2012
Colour Q 139
Hello
I'm back with my card for this week's Colour Q Challenge, here is the inspiration piece
Such a cute top, I love the detail down the side seam too
And this is my card
This is about the 3rd version - my original inspiration came from a paper bag my son decorated last weekend with some offcuts he found lying around my studio, but as often happens, things tend to change on the fly for me. Hidden under this sentiment, is a version that was embossed directly onto the card. Unfortunately it wasn't quite bold enough, so I added this one over the top, popped up on dimensionals.
I'm quite happy with the way this has turned out. It kind of reminds me of those old fairisle jumpers your Nana used to make for you.
Hope you've been enjoying your weekend and thanks for visiting.
Supplies Used: All Stampin' Up unless otherwise noted
Stamps: On your Bike (Hero Arts/Sizziz)
Ink: Distress Embossing Ink (Ranger)
Cardstock: Crumb Cake, Bashful Blue, Night of Navy, Rich Razzleberry, Whisper White
Accessories: Big Shot, Big Shot Adhesive Sheets, Ric Rac Die (PTI), Heat Tool, White Embossing Powder
Saturday, May 26, 2012
Colour Q 138
Evening
As we had plasterers in today finishing off the ceiling and patching up holes made by us removing old, ugly shelves, thermostats etc, there was nothing much to do but to head down to the studio since I have heating down there (having the heater on made it too hot for the plasterers). It meant that I got a head start on this week's Colour Q challenge - these are the colours for this week's challenge
Aren't these heels so cute? Anyway, my card was inspired by this wrapping paper I saw whilst doing some Christmas shopping last year
and this tutorial on how to make it. I love this pattern, as you can see I've even used it for the background image of my blog. Here's the finished card
Now, if there is anyone reading my blog that makes dies, I would really love it if you could manufacture one to make this pattern. Whilst it is relatively easy to make, it is also really easy to mess it up. Every now and again, the punched pieces misaligned ever so slightly and they didn't quite line up/join together as well as I would have liked.
The sentiment is from Best Dad Ever and has been embossed using White EP. I made the flag ends because I don't yet have a die for that :)
Thanks for visiting, hope you're enjoying your weekend
Supplies Used: All Stampin' Up unless otherwise noted
Stamps: Best Dad Ever
Ink: Distress Embossing Ink (Ranger)
Cardstock: Whisper White, Crumb Cake, Pool Party, More Mustard, Poppy Parade
Accessories: Heat Tool, White EP, 1-3/4" RD punch
Saturday, May 19, 2012
ColourQ 137
Hi
Back again for Colour Q Challenge #137. These are the colours we had to work with
Pretty, aren't they. I wasn't quite sure what I was going to do with these, except that I knew it was going to be something floral. Then on Tuesday, I was able to sign up for the 'A Cut Above' class for the Big Shot. One of the topics was making shaped cards and they used the Stampin' Up! Framelits Labels Collection, which I have, and that got my mind ticking over. This is what I made
I made my card using the largest framelit and then cut a piece of watercolour cardstock the same size and adhered that to the folded base. Then I cut a frame using the largest and the next size down. I used the Brushless Watercolour technique to stamp the images on the watercolour paper. The sentiment is stamped using Basic Gray ink on vellum. Since it is stamped on vellum, it stayed wet enough for me to emboss with clear EP. The vellum strip is attached to the back of the frame and the frame is attached to the card using foam mounting tape, so it pops up.
You may be wondering how I got it to stand up like that. Well, it's magic, lol. Nope, the card stuck with dotto to the front of my black sharpener, which has blended into the background very nicely.
Well, that's it from me tonight. It's late and I given myself a bit of an injury whilst photographing the card. Ended up taking a tumble after my chair slipped out from under me as I went to sit back down on it after adjusting the card to make sure it was straight. Going to have a bit of a bruise on my thigh I think :)
Thanks for visiting, hope you're enjoying your weekend.
Supplies Used:
Stamps: Nature's Moments (Tim Holtz - Stampers Anonymous), Birthday Basics (PTI)
Ink: Shaded Lilac, Shabby Shutters, Broken China (Tim Holtz - Ranger), Basic Gray (SU)
Cardstock: Basic Gray, Vellum (SU), watercolour paper (LSS)
Accessories: Big Shot, Framelits Labels Collection, Clear EP, Heat Tool (SU), Mini Mister (Ranger)
Sunday, May 13, 2012
ColourQ 136
Oh my, what a busy day. I thought Mother's Day was supposed to be nice and relaxing. Oh well, it's been a good day, even if it's been non stop.
I'm really enjoying participating in the Colour Q challenges. This week's colours are just gorgeous, take a look (I want this scarf)
I had lots of ideas spinning through my head for this week andI had a few shipments of new goodies on their way to me and I wasn't quite sure they would arrive on Friday. Luckily they ALL did and this what I made using my brand new die.
I've seen this Memory Box die on Debby's blog and thought it was just gorgeous, so when I had to order something, it just found it's way into my cart. Funny how that happens.
I have actually inlaid the die cut into the top panel which I found to be quite a fiddly task with two broken nails - couldn't pick anything up off my desk. A few deep breaths were taken when adding the sentiment, because everything was finished before I added that. Thank goodness it is straight, with no smudges or inky outlines :)
I really love how it turned out and can't wait to use it again. In fact, I made another couple of cards using the cut white cutout from the white panel.
Well, got to go, I'm time converting in my head and that's never a good thing.
Thanks for visiting and I hope you've had a fantastic day
Supplies Used: All Stampin' Up! unless noted otherwise
Stamps: Botanical Silhouettes (PTI Anniversary)
Ink: Always Artichoke
Cardstock: Whisper White, Pear Pizzaz, Daffodil Delight, Tangarine Tango
Accessories: Big Shot, Prim Poppy die (Memory Box), sticky strip, dimensionals
Sunday, May 6, 2012
ColourQ 135
Hi
Back again this week for ColourQ challenge 135. Aren't these colours sweet together?
When I saw them, I knew exactly what I was going to do. Take a look
It hasn't turned out quite as cute as I imagined it in my head, but I'm pleased with it none the less. I've had this set for awhile now but hadn't gotten around to using it. The balloons were pretty easy to cut out, and the saffron one is popped up on a double layer of dimensionals.
Well, I'm off - it's been one of those days and I've still got 101 things to get done.
Thanks for visiting
Supplies Used: All Stampin' Up! unless otherwise noted:
Stamps: Up, Up & Away
Ink: So Saffron, Ruby Red, Pool Party, Early Espresso
Cardstock: Whisper White, Early Espresso
Accessories: Big Shot, In the Meadow Die (PTI)
Wednesday, May 2, 2012
Please Indulge Me
as I quitely (or not so) toot my own horn.
The card that I entered in the ColourQ 134 challenge was chosen as the Colour Queen. I cannot tell you how excited I was when I saw the post this morning. There was a tear or two!! Check out the cool badge I now have in my sidebar.
Now I have the closing deadlines stored in this sieve like brain of mine, I will be trying to play along more often. In fact, I've already worked out what I'm going to do for this week's colours.
Thanks for visiting *toot toot*
Sunday, April 29, 2012
Colour Q 134 Challenge
Afternoon
For some time now I have wanted to play along with the Colour Q Challenges for quite some time but it has just never worked out. After a bit of tidying in the studio last night, I decided to see when this week's challenge closed, and as it turned out, I still had time to play along.
This is the colour combo for this week
And this is what I came up with
I used my new Apothocary Art set and the coordinating Labels Collection framelit. I used my blender pen to colour the flowers using Calyspo Coral and Pumpkin Pie inks, the main image and sentiment are stamped using Bravo Burgandy - I think this is the 2nd time I've used it in 6 years. The sentiment is from a PTI Anniversary set - Round and Round. The background has been stamped using PTI's Background Basics - Tin Types using Pool Party ink.
I know it's really simple but I really like how it has turned out. And now I have realised that if I can make it down to the studio on a Saturday night, I can play along with Colour Q more often - yay!
Thanks for visiting and I hope you are enjoying your weekend.
Supplies Used - All Stampin' Up! unless noted otherwise
Stamps: Apothocary Art, Background Basics - Tin Types, Round and Round (PTI)
Cardstock: Pool Party, Watercolour Paper (LSS)
Inks: Pool Party, Calyspo Coral, Bravo Burgandy, Pumpkin Pie
Accessories: Big Shot, Framelits - Labels Collection, dimensionals, corner rounder (retired)
Subscribe to:
Posts (Atom)